VRC Documentation
Running VRC for the First Time
The Default Profile
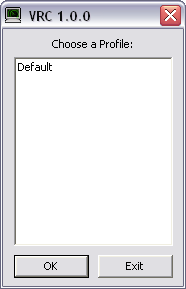
When you run VRC, the first thing you see is the Profile Selection Window. The first time you run VRC, the profile list will contain only the "Default" profile, as shown here:

Once you have configured VRC and created one or more profiles (see "The Profile System") those profiles will be listed in the Profile Selection Window as well. Since this is your first time running VRC, you will obviously have to start with the Default profile. Select the Default profile either by double-clicking on the entry in the list, or by clicking it once then pressing Enter or clicking the OK button.
After loading the Default profile, you will see a single Display window (the scope) on your primary monitor. No other windows will be loaded for now. Also, this Primary Display will not have any sector data loaded yet. You will also see a reminder message telling you to specify a POF file. See below for more information on initial configuration.
What VRC Does at Startup
After selecting a profile, VRC does two things before allowing you to continue:
- Downloads the server list
- Performs a version check
When VRC downloads the server list, it makes a web connection to the VATSIM data servers in order to fetch a list of currently available servers for you to connect to. This usually takes about 5 or 6 seconds to complete. If you are running a firewall, you may be prompted to allow VRC to access the internet. You will have to allow this in order to use VRC.
After downloading the server list, VRC then makes another web connection to the VRC web site in order to confirm that you are running the latest version. If you are not, then you will see a message showing that there is a new version available. When you see this message, you should visit the VRC website and download the new installer.
If either the server list download or the version check fails, you may see an error displayed at the bottom of the scope. Normally you can continue to use VRC if the server download fails, but only if it has succeeded at least once previously. This is because each time the server list is downloaded, it is cached on your hard drive. This allows VRC to load the last successfully-downloaded server list in case the download fails.
It's fine if the version check fails as that will not prevent you from using VRC.
Loading a Sector File
The first thing you should do is load a sector file. You can usually get sector files from the website for the area where you will be controlling. Download the sector file and save it in your "My Documents\VRC" folder. (You can save the sector file anywhere you like, but it's easiest if they are in your "My Documents\VRC" folder so that you don't have to dig for them later when you actually load them.) Then, select "Open Sector..." from the "File" menu. In the window that opens, double-click the sector file. The sector file may take a few moments to load, depending on the speed of your computer and the size of the file. After it is done loading, you will see the sector information on your Primary Display. You can experiment with the options in the "View" menu in order to turn various pieces of sector data on and off.
Initial Configuration
Once a sector file is loaded, you could connect and start controlling right away, but there are a few items you'll want to configure first in order to be able to use all of VRC's features. The first such item is your key configuration. This includes your Push-to-talk (PTT) key and your Aircraft Select (ASEL) key. The PTT key is used when transmitting your voice either to pilots or other controllers via a "land line" connection.
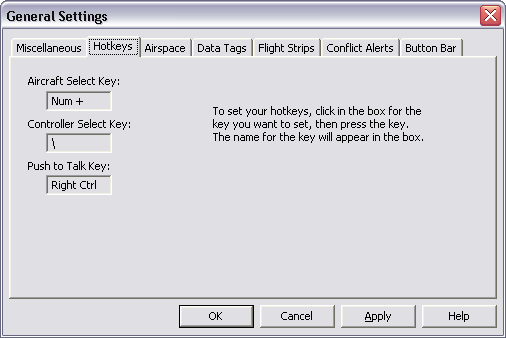
In order to configure these keys, open the "Settings" menu and choose "General...". This will open the main VRC General Settings window. Select the "Hotkeys" tab:

To set the key, click in the box, then press the key you wish to use. The name of the key will be shown in the box. Be sure to use a key that you will not be needing for any other reason while using VRC. The default settings are usually best if you haven't used VRC or ASRC before. Press the "Apply" button to save your hotkey settings.
Other items that you should configure right away include:
- POF file
- Alias file
- Arrival & Departure field lists
- ATIS
See the section on Configuring VRC for details on how to configure these items.
Connecting to VATSIM
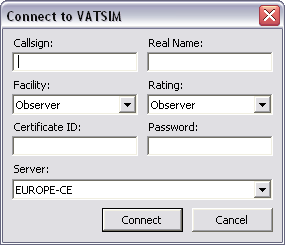
Once you have completed the basic configuration, you are ready to connect to VATSIM. To do so, choose "Connect..." from the "File" menu. You will then see the Connect Window:

First, fill in your chosen callsign. The first time you connect, while you are getting used to the VRC interface, you should connect as an Observer, so choose an appropriate Observer callsign. Usually, the staff for the area where you will be controlling will have policies on how you should format your callsign when connecting as an Observer. For example, at the Virtual Boston ARTCC (ZBW), I would use "BOS_CN_OBS". The first three letters are the airport identifier, the second two letters are my operating initials, and the last three letters obviously identify you to the network as an Observer. Observer callsigns should always end in "_OBS".
Next, fill in your Real Name. This is required to be accurate in order to comply with VATSIM policies.
Next, select the facility type you will be connecting as. The first time you connect, you should leave this as "Observer".
Next, select your VATSIM rating from the "Rating" dropdown list. If you have not yet attained any ratings as a controller, you will need to select "Observer". The VATSIM servers will not allow you to connect unless you choose the correct rating from this list.
Next, enter your VATSIM CID and Password. These are normally numeric, at least 6 digits each. You get them when first registering on VATSIM.
Next, select the appropriate server from the "Server" dropdown list. Choose a server that is "geographically close" to your real-world location. All of the servers are interconnected, so you will be able to "see" any controllers or aircraft within range regardless of which server they choose to connect to.
Finally, press the "Connect" button. The Connect Window will close, and VRC will attempt to connect to the VATSIM network using the information you just provided. Text messages will be shown in the Primary Display telling you whether or not the connection succeeded. Normally, the connection will happen instantly, and you will see some welcome messages from the server. The Primary Display title bar will also be updated to show which server you are connected to.
You are now connected to VATSIM!
Creating Your First Profile
Once you have gone to all the trouble of configuring the above items, you won't want to have to do it all over again the next time you use VRC, so you should save your settings in a session profile. To do so, choose "Save Session Profile As..." from the "File" menu. You will be prompted to enter a name for your session profile. Since this first profile is just for observing, you should give it a name that identifies it as such. For example, if you are observing at KBOS, a good name for the session profile might be "Boston Observer".
After you type in a name and press Enter, VRC will save the session profile in your VRC.ini file. The next time you start VRC, this new profile will be listed in the Profile Selection Window, allowing you to quickly re-load these settings.
For details regarding creating and using session profiles, see "The Profile System".
Disconnecting From VATSIM
When you are ready to disconnect from the network, choose "Disconnect" from the "File" menu. You will be prompted to confirm that you really wish to disconnect (this prompt can be disabled in the General Settings) and then your connection will be closed, assuming you confirm the disconnect. A message will be shown in the Primary Display showing that you are no longer connected. The title bar will be updated as well.
Closing VRC
When your VRC session is over, you can close VRC by either clicking on the standard window close button (usually an X in the upper right corner) in the Primary Display, or by choosing "Exit" from the "File"menu. If you are still connected to VATSIM, you will be prompted to confirm that you really wish to disconnect. If you have unsaved changes in your session profile, you will also be prompted to save the profile before closing VRC. Both of these prompts can be disabled in the General Settings.